Tutorials
1. Basic stuff
Tips on selecting your messages, websites, sections and items from other lists
01.
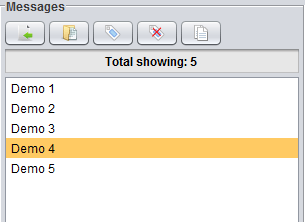
Messages / websites / sections / pages / RSS / etc. are displayed in the simple list.
To select a single item just click on the name.
There are few ways to select multiple items:
To select a single item just click on the name.
There are few ways to select multiple items:
- Hold down CTRL key and click on items you want to select.
- Hold down SHIFT key to select a range of items.
- Press on single item, then press CTRL+A to select all items.
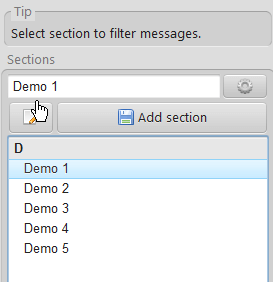
- Use the "select all" button (bottom left in the screenshot) to select all items.
- Use special search and filter field at the bottom:

Just type the name or part of the name you want to filter and all items containing the searched string will be filtered.
- There is special search and filter keyword "NOT". Must written at the start all uppercase. Will filter everything not containing words after it.
- There is special search and filter keyword "OR". For example: text1 OR text2.
- You can also enable in "Settings" -> "List search as selector" and then all filtered items will be automatically selected.
- To filter your messages you need to select section(s) first.
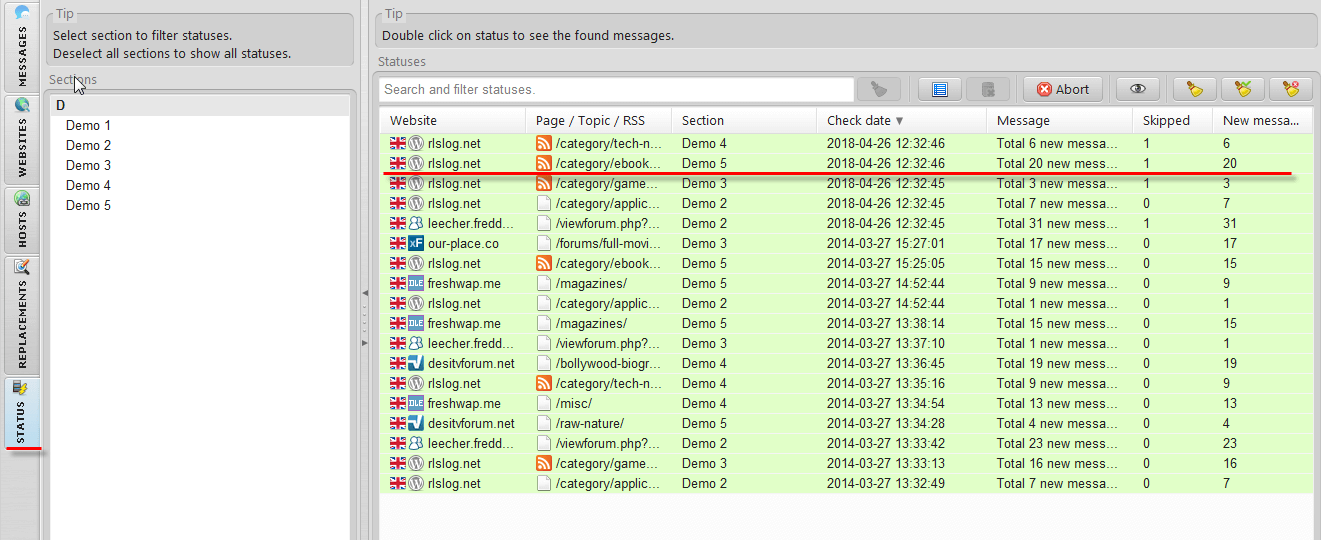
- You can filter statuses by section by selecting wanted section(s) from the list on the left (in STATUS tab).
| List | You can filter by | Special filter terms |
|---|---|---|
| Sections | name | - |
| Messages | subject, URL | - |
| Websites | name, URL, category, type | - |
| Website's RSS feeds | name, URL, section | - |
| Website's Pages | name, URL, section | - |
| Statuses | website name, website URL, website category | - |
| Replacements | search string, replace with | - |
Message tips
02.
- To preview your formatted message click on the eye button.

- Clear your old message by clicking the clear button (see the screenshot above).
- There are two special tags <postSubject> and <postUrl> which can be inserted to message text if needed.
- Use ALT+X shortcut for quick message preview.
- Spell checker is supported (English only), but disabled by default due to more RAM (memory) usage. You can enable it if needed from "bin" folder, open file "config.properties" (in any text editor). Change the value for "SPELL_CHECKER" from "false" to "true".
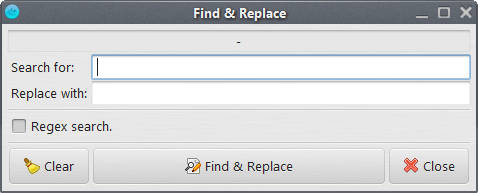
- Replace text window can be accessed via right click -> "Replace" or CTRL+H shortcut. You can pre-select some text which will be pre-filled in "Search for" field.
- Zoom (change font) of text area with shortcut "CTRL + mouse wheel".
- Open in browser - right click option on text fields / areas. Opens the selected text in browser. If selected text is or has URL - opens URL. If selected text doesn't have URL - opens Google search with that text. Selected text can have multiple URLs if needed (each URL will be opened). Can also have BBCode tags around URL(s), BBCode will be ignored.
- Tags tips:
- There is an option in "Settings" -> "Main settings" -> "Messages" -> "Use words in subject as tags".
- You can set tags for each section.
- You can set tags for each added page / RSS feed.
- You can use tags replacements to add / remove / change tags.
Other tips
03.
A lot of elements in the program has a little tool-tip pop-up box with information.
All buttons with just an icon has it, also a lot of fields, table rows or cells and other things.
To view the message simply mouse over an element and don't move for 1 second.
Clean-up at least some of the statuses from "STATUS" tab when they are not needed anymore.
They do take some of the memory (RAM).
Some other features:
- Access your websites quickly by double clicking on the website in the list (you can also double click to open in the browser on Pages, RSS feeds, Messages).

- Some tables and lists have useful right click options. For example "STATUS" table:

- The program has standard shortcuts F1 to open FAQ / Tutorials page and F2 to open the forum.
- You can view all keyboard shortcuts in "Help" menu -> "Shortcuts".
- Make sure to check "Main settings" window to be familiar with various settings.
License information
04.
There is menu under "Help" -> "License" where you can see the license information and copy the license key fast when needed.
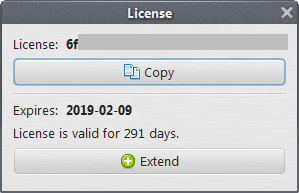
At the bottom there is number (which means days the license is valid for) and two buttons: first one just opens the same "Help"->"License" window. Second - opens page in browser with extending information.

The number at the bottom becomes yellow when less than 10 days left until expiration date and red when less than 5 days left.
When less than 3 days you will see a small information message with reminder to extend.
At the bottom there is number (which means days the license is valid for) and two buttons: first one just opens the same "Help"->"License" window. Second - opens page in browser with extending information.
The number at the bottom becomes yellow when less than 10 days left until expiration date and red when less than 5 days left.
When less than 3 days you will see a small information message with reminder to extend.
2. Websites and website's pages / topics / RSS leeching related
How to add website
01.
To add website go to "WEBSITES" tab:

When adding new website you can use shortcut ALT + Z to clean the fields if needed.
You can also import websites from .txt file since 2.18 version.
- Enter the URL in the URL field.
- Must be main URL. As example used http://www.rlslog.net
- If it's forum you need to enter main URL to forum, sometimes it's just host URL (like http://www.rlslog.net), but sometimes you might need "/forum" or something similar, for example: http://leecher.themasoftware.com/forum
- Choose a category for website if needed.
- If you don't have any categories press the "Add" (green plus) button to add a category.
- Categories are only within program for organizing websites.
- The type is just to display supported types.
- You don't need to select anything.
- Press the "Add website" button and the website will be added.
When adding new website you can use shortcut ALT + Z to clean the fields if needed.
You can also import websites from .txt file since 2.18 version.
How to auto leech from specific category / sub-forum periodically
02.
You can leech from website's category, sub-forum or just some user's posts page.
You will usually leech from some category / sub-forum. You will need the URL of the category / sub-forum you want to leech from.
As example I will be using this URL: http://www.rlslog.net/category/tech-news/
You can add all URLs for wanted website in "WEBSITES" -> "Pages" tab:

You will usually leech from some category / sub-forum. You will need the URL of the category / sub-forum you want to leech from.
As example I will be using this URL: http://www.rlslog.net/category/tech-news/
You can add all URLs for wanted website in "WEBSITES" -> "Pages" tab:
- Go to "WEBSITES" tab.
- Select a website.Enter the URL in the "Pages" tab URL field.
- If the website is forum, you need to add sub-forum URL (where topics are located).
The name will be automatically set to path of your URL.- You can change it if you want, it's only for displaying in the program.
Choose a section where messages will be leeched.- If you don't have any sections press the "Add" (green plus) button to add a section.
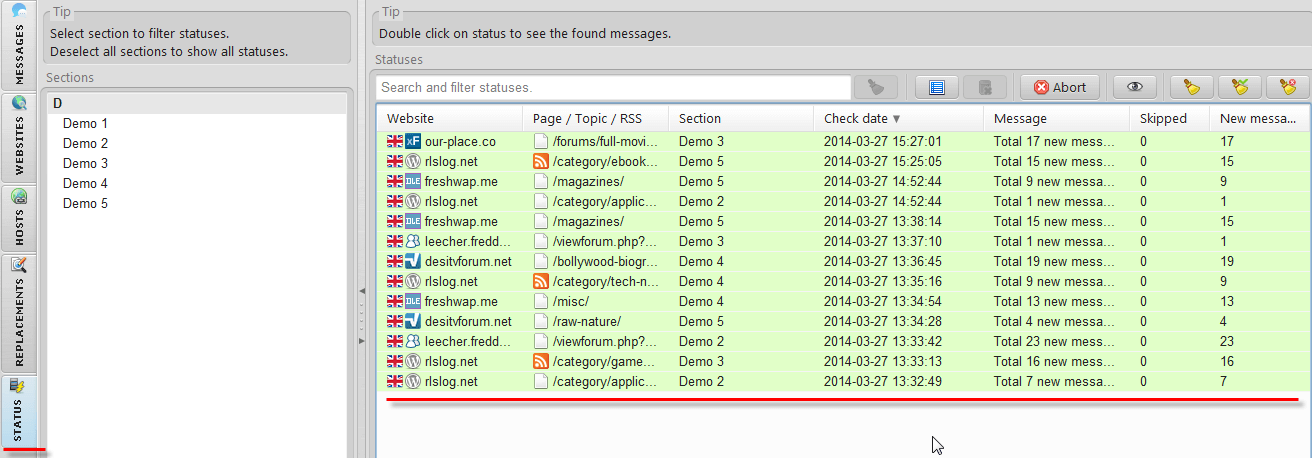
On the left you can see sections list, you can select a section to filter statuses by section. When no section is selected all statuses are shown.
You can double click on the status and it will show you the found messages (you will be taken to "MESSAGES" tab automatically and the messages will be displayed on the right in messages list).

The added page URL will be checked at specified interval (default is 1 hour, you can change this option in main settings).
It only leeches messages from the page URL itself (it won't go through pages inside that URL, if you need second page you can add second page URL to the program and it will leech it, but it will also check that page periodically and that is not needed since all new messages will be in the first page. You should leave in the program only the URL of the main category).
You can see the time left till the next check at the bottom:

There is also a button to "Check now". All websites will be checked for new messages only (it won't leech the messages which are already added).
There are check now buttons in "WEBSITES" tab to check specific websites and also in "WEBSITES" -> "Pages" tab to check only wanted pages.

Statuses with no new messages found are removed automatically by default (this can be changed in the main settings).
How to leech full topic (mega-thread)
03.
Topics leeching is supported for most popular forum types: vBulletin, phpBB, IPBoard, MyBB, SMF, XenForo.
The whole topic is leeched once and not checked periodically for new messages.
1. Add needed forum as described in 2.1 chapter above.
2. Add your user if needed (some forums don't allow to view topic or content when not logged in) as described in 2.5 chapter below.
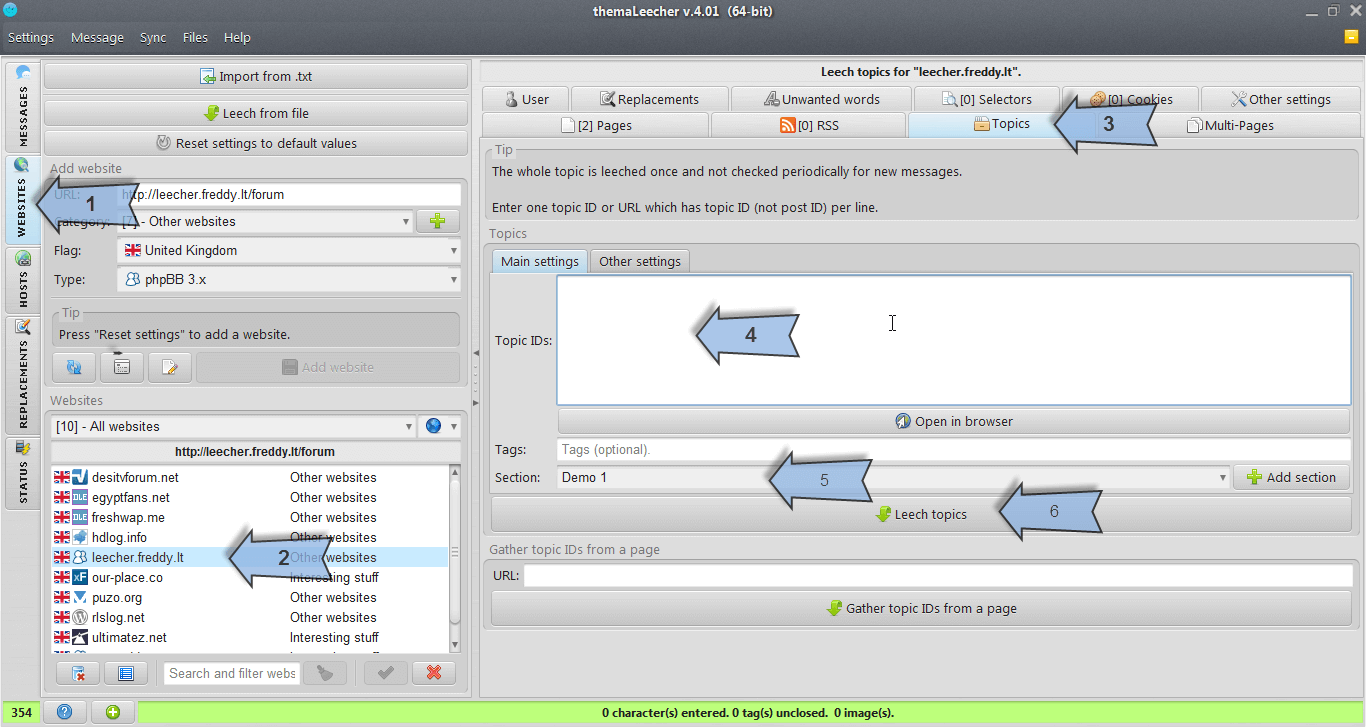
You can leech topic in "WEBSITES" -> "Topics" tab:

On the left you can see sections list, you can select a section to filter statuses by section. When no section is selected all statuses are shown.
You can double click on the status and it will show you the found messages (you will be taken to "MESSAGES" tab automatically and the messages will be displayed on the right in messages list).
Statuses with no new messages found are removed automatically by default (this can be changed in the main settings).
The whole topic is leeched once and not checked periodically for new messages.
1. Add needed forum as described in 2.1 chapter above.
2. Add your user if needed (some forums don't allow to view topic or content when not logged in) as described in 2.5 chapter below.
You can leech topic in "WEBSITES" -> "Topics" tab:
- Go to "WEBSITES" tab.
- Select a website.
- Go to "Topics" tab.
- Enter topic ID.
- Choose a section where messages will be leeched.
- If you don't have any sections you can add them from "MESSAGES" tab.
- Press the "Leech topic" button.
- Use first line of message as subject.
- You can also specify custom range of pages if needed.
On the left you can see sections list, you can select a section to filter statuses by section. When no section is selected all statuses are shown.
You can double click on the status and it will show you the found messages (you will be taken to "MESSAGES" tab automatically and the messages will be displayed on the right in messages list).
Statuses with no new messages found are removed automatically by default (this can be changed in the main settings).
How to leech from RSS feed
04.
You will need the URL of RSS feed you want to leech from.
As example I will be using this URL: http://www.rlslog.net/category/tech-news/feed/
You can add all RSS feeds for website in "WEBSITES" -> "RSS" tab:

On the left you can see sections list, you can select a section to filter statuses by section. When no section is selected all statuses are shown.
You can double click on the status and it will show you the found messages (you will be taken to "MESSAGES" tab automatically and the messages will be displayed on the right in messages list).
The added feed URL will be checked at specified interval (default is 1 hour, you can change this setting in main settings).
You can see the time left till the next check at the bottom:
There is also a button to "Check now". All feeds will be checked for new messages only (it won't leech the messages which are already added or were checked previously).
There is a button to "Check now" only selected feeds in "WEBSTES" -> "RSS" tab:
Statuses with no new messages aren't added to the table by default (this can be changed in the main settings).
As example I will be using this URL: http://www.rlslog.net/category/tech-news/feed/
You can add all RSS feeds for website in "WEBSITES" -> "RSS" tab:
- Go to "WEBSITES" tab.
- Select a website.
- Enter the URL in the "RSS" tab URL field.
- The name will be automatically set to path of your URL.
- You can change it if you want, it's only for displaying in the program.
- Choose a section where messages will be leeched.
- If you don't have any sections press the "Add" (green plus) button to add a section.
- Press the "Add feed" button and the RSS feed will be added.
On the left you can see sections list, you can select a section to filter statuses by section. When no section is selected all statuses are shown.
You can double click on the status and it will show you the found messages (you will be taken to "MESSAGES" tab automatically and the messages will be displayed on the right in messages list).
The added feed URL will be checked at specified interval (default is 1 hour, you can change this setting in main settings).
You can see the time left till the next check at the bottom:
There is also a button to "Check now". All feeds will be checked for new messages only (it won't leech the messages which are already added or were checked previously).
There is a button to "Check now" only selected feeds in "WEBSTES" -> "RSS" tab:
Statuses with no new messages aren't added to the table by default (this can be changed in the main settings).
Adding user for website
05.
You can add user to the website in "WEBSITES" -> "User" tab.
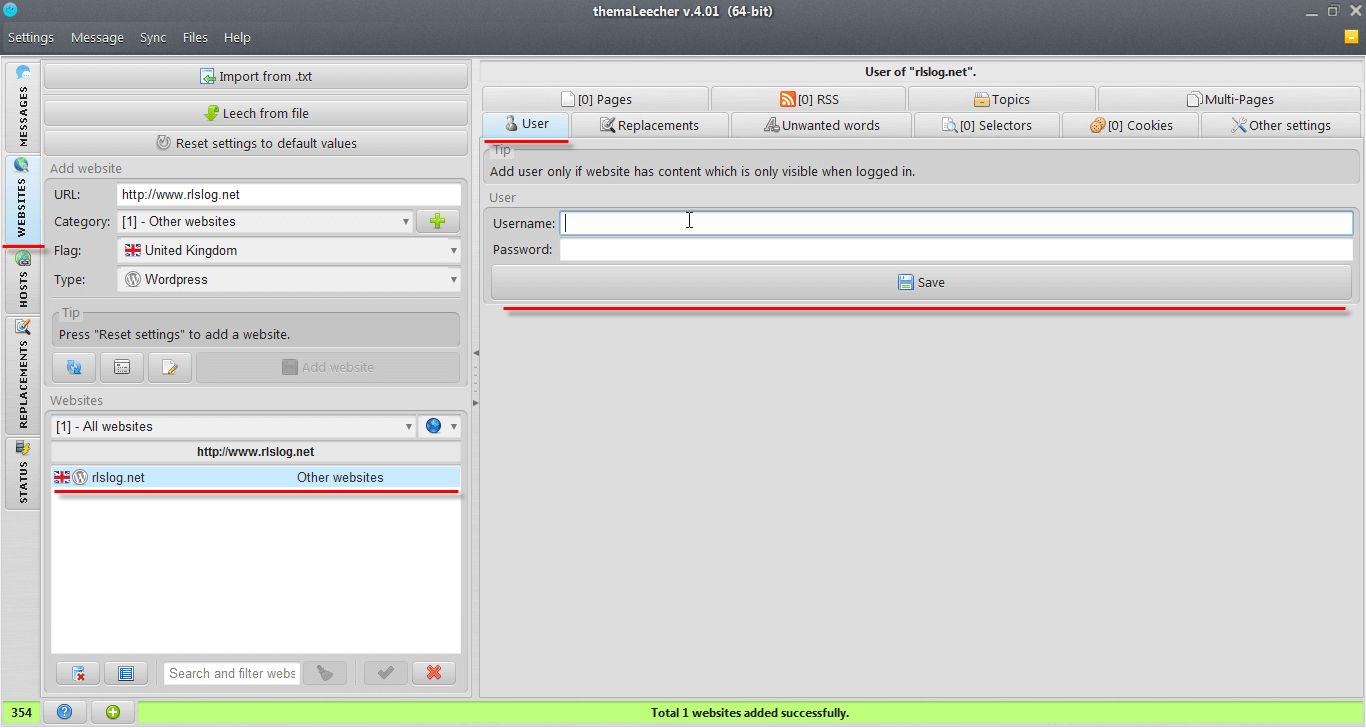
You should only add user if some content from website is not visible when not logged in.
If it's not needed to be logged in to see some content, then by adding user you will only decrease performance.
To add user just select website and in "User" tab enter username, password and press "Save" button.
Adding user is only available for supported types (expand to see supported types)
If you want to remove previously saved user, just clear the username, password fields and press "Save" button.
You should only add user if some content from website is not visible when not logged in.
If it's not needed to be logged in to see some content, then by adding user you will only decrease performance.
To add user just select website and in "User" tab enter username, password and press "Save" button.
Adding user is only available for supported types (expand to see supported types)
- phpBB
- vBulletin
- IP Board
- SMF
- myBB
- DLE forum
- DLE blog
- Discuz
- Discuz X
- xenForo
- fluxBB
- Icy Phoenix
- punBB
- miniBB
- phpWind
- Burning Board
- uCoz blog
- Blogger (blogspot)
- Wordpress
If you want to remove previously saved user, just clear the username, password fields and press "Save" button.
Custom selectors for website
06.
The program supports all websites. The selectors are used to find subject text, message text, messages (URL and subject) and remove unwanted elements from message (when needed).
The basic build-in types has some default selectors and leeching for them usually works fine.
You only need to add custom selectors if leeching doesn't work.
The selectors are based of "HTML" in the website's page / post source (which you can view with browser).
You can read about the selectors, their types and see some examples here: http://jsoup.org/apidocs/org/jsoup/select/Selector.html
To add custom selectors when needed go to "WEBSITES" tab -> select a website -> "Selectors" tab:

There are four main groups for selectors:
Selectors are based on HTML source. All browsers have the ability to "View source" or "View page source" (it's named differently depending on browser). However nowadays most browser has feature "Inspect element" which is much easier to use and in the example below will be using "Inspect element" feature of "Firebug" plugin for Firefox (there is default "Inspect element" feature in Firefox, Chrome, Opera and others which is practically the same).
For example let's take a look at random website: http://techcrunch.com.
For "Subject" and "Message" you will always need to go to a specific post. Random post: http://techcrunch.com/2014/07/12/the-great-fragmentation-we-are-all-weirdos-now/
Just right click on the subject and choose "Inspect element":
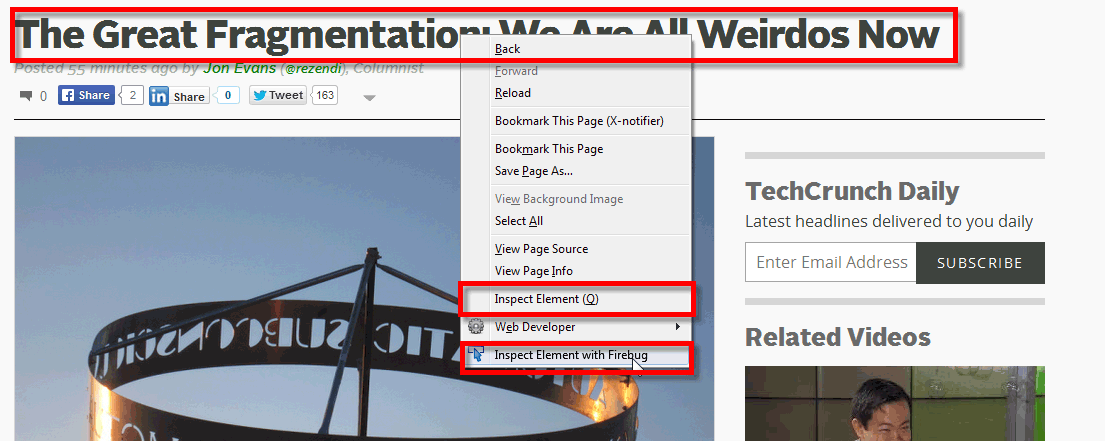
You will see a separate small window open with HTML source of that place where you clicked. In this case it looks like this:
The line with subject is highlighted. In this case it's h1 element with class names alpha and tweet-title. So the "Subject" selector can be: h1.tweet-title or h1.alpha or just h1 (without class since page usually has only one h1 element).
In other websites the element can be different. Most common elements are: h1, h2, h3, h4, div, span, p and others. Usually you would use it some class name or id.
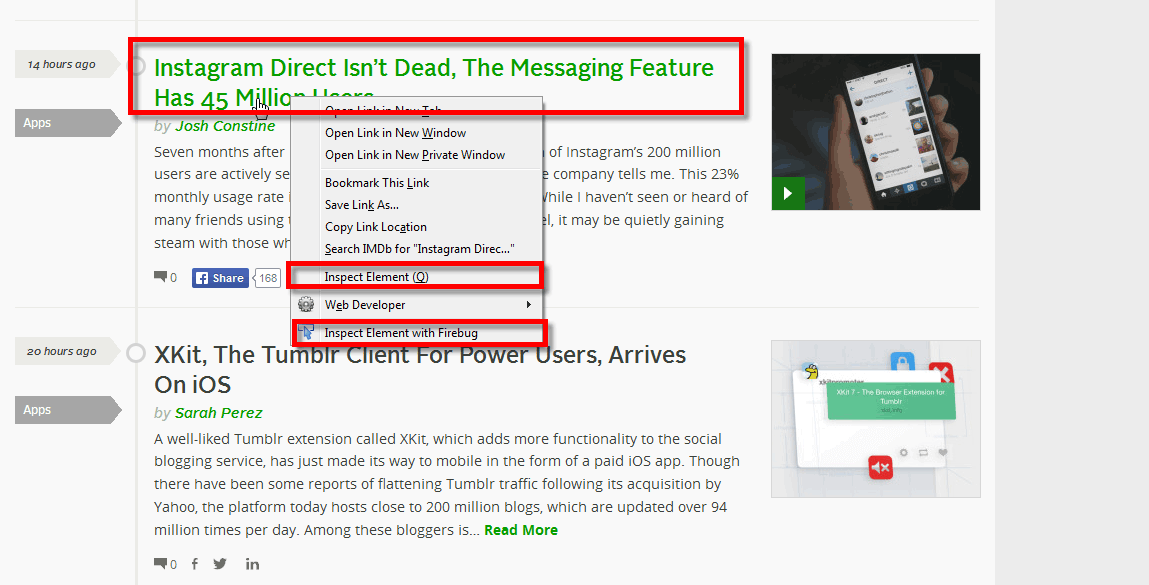
Now right click near the message start and choose "Inspect element" again. In this case it looks like this:

The highlighted line in this case is image because the message starts with image. You can see that whole message is surrounded with div element with class name article-entry and text. So the "Message" selector can be: div.article-entry or div.text.
In most websites elements will have a single class (not two like in this website), so the selector will be obvious.
Finally you will need to add "Subject with URL" selector to find posts. For this selector go to any category (section) page. Random category: http://techcrunch.com/mobile/.
Now you need subject with URL. So right click on any post's subject which has URL to that post:
In this case HTML looks like this:

You can see subject and URL (<a> element). For "Subject with URL" selector you can add element which has inside the needed <a> element or the <a> element itself if it has some class. Usually you would add element which has the needed <a> element inside.
In this case the "Subject with URL" selector would be h2.post-title.
There is also group of selectors called "Remove elements". For this website there wasn't anything to remove, but in general you would use these selectors if message text has some unwanted elements (text, image, buttons). For example it might be advertisement, social buttons, sometimes if's not possible with "Message" selector to grab only the message and you also need to remove comments, general information and etc..
If you not sure what to add, better ask in official forum: open forum. Make sure to follow the requirements when creating new topic: open requirements, otherwise the topic might get deleted without notice. However please try it yourself first, it's not that hard.
The basic build-in types has some default selectors and leeching for them usually works fine.
You only need to add custom selectors if leeching doesn't work.
The selectors are based of "HTML" in the website's page / post source (which you can view with browser).
You can read about the selectors, their types and see some examples here: http://jsoup.org/apidocs/org/jsoup/select/Selector.html
To add custom selectors when needed go to "WEBSITES" tab -> select a website -> "Selectors" tab:
There are four main groups for selectors:
- Subject - subject inside post URL (grabs first element found).
- Message - message inside post URL (grabs first element found).
- Subject with URL - subject with post URL inside "Page" URL (which you add in "Pages").
- It should be <a> element or element surrounding it (the program will try to grab first <a> inside it).
- Grabs all elements [all posts] (not just first).
- The posts URLs grabbed with this selector are used to find the message text.
- Remove elements - remove unwanted elements from message.
- Might be advertisements, sometimes the main message is not surrounded with any tag and you need to grab element with some basic post information which needs to be removed.
Selectors are based on HTML source. All browsers have the ability to "View source" or "View page source" (it's named differently depending on browser). However nowadays most browser has feature "Inspect element" which is much easier to use and in the example below will be using "Inspect element" feature of "Firebug" plugin for Firefox (there is default "Inspect element" feature in Firefox, Chrome, Opera and others which is practically the same).
For example let's take a look at random website: http://techcrunch.com.
For "Subject" and "Message" you will always need to go to a specific post. Random post: http://techcrunch.com/2014/07/12/the-great-fragmentation-we-are-all-weirdos-now/
Just right click on the subject and choose "Inspect element":
You will see a separate small window open with HTML source of that place where you clicked. In this case it looks like this:
The line with subject is highlighted. In this case it's h1 element with class names alpha and tweet-title. So the "Subject" selector can be: h1.tweet-title or h1.alpha or just h1 (without class since page usually has only one h1 element).
In other websites the element can be different. Most common elements are: h1, h2, h3, h4, div, span, p and others. Usually you would use it some class name or id.
Now right click near the message start and choose "Inspect element" again. In this case it looks like this:
The highlighted line in this case is image because the message starts with image. You can see that whole message is surrounded with div element with class name article-entry and text. So the "Message" selector can be: div.article-entry or div.text.
In most websites elements will have a single class (not two like in this website), so the selector will be obvious.
Finally you will need to add "Subject with URL" selector to find posts. For this selector go to any category (section) page. Random category: http://techcrunch.com/mobile/.
Now you need subject with URL. So right click on any post's subject which has URL to that post:
In this case HTML looks like this:
You can see subject and URL (<a> element). For "Subject with URL" selector you can add element which has inside the needed <a> element or the <a> element itself if it has some class. Usually you would add element which has the needed <a> element inside.
In this case the "Subject with URL" selector would be h2.post-title.
There is also group of selectors called "Remove elements". For this website there wasn't anything to remove, but in general you would use these selectors if message text has some unwanted elements (text, image, buttons). For example it might be advertisement, social buttons, sometimes if's not possible with "Message" selector to grab only the message and you also need to remove comments, general information and etc..
If you not sure what to add, better ask in official forum: open forum. Make sure to follow the requirements when creating new topic: open requirements, otherwise the topic might get deleted without notice. However please try it yourself first, it's not that hard.
Custom cookies for website
07.
Custom cookies mostly would be used for login on "Other" type or bypass some security page.
All basic supported blogs / forums already have ability to save user. For all basic types if really needed just use that and it will login before leeching.
Websites usually add a lot of random cookies. For "Other" type login information in cookies is usually stored in one / two cookies.
For example: https://sanet.st
For login you need only: "id" and "sa_remember" cookies.
Cookies don't last forever. If it's login make sure to mark in websites "Remember me" option and not logout from website (because that would also invalidate cookies). They can last a year or just a month. It solely depends on website.
In program you only need "Name", "Value" and specify some expiration date.
For Firefox just go to "Tools" -> "Browser Tools" -> "Web Developer Tools" -> click on "Storage" tab (or just SHIFT+F9 shortcut).
Firefox cookies window looks like this (you can easily see "Name" and "Value" columns):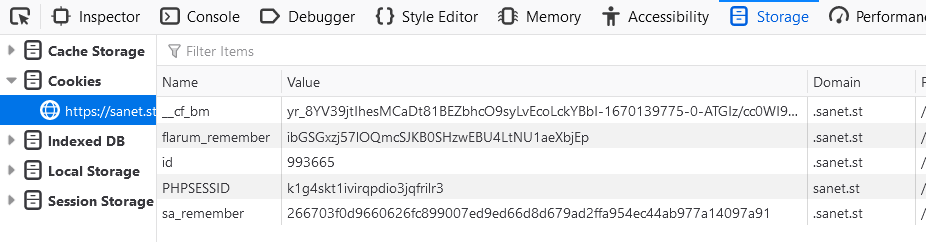
Other browsers show them similarly as well.
3. General leeching related
How to leech from specific post URL
01.
To leech by post URL you will only need the URL of some post.
For example I will be using this URL: http://www.rlslog.net/8-megaupload-megavideo-alternatives/
Enter the post URL in the "post URL" field which is above the message area.
On the left there is a "type" selection. You don't need to select anything. It's just to show the supported types. The type of the URL will be determined automatically.
On the right you can see a "Visit" button which will open the URL in the browser.
Just press the "Leech" button on the right and the message will be leeched.
There is also "Paste & Leech" button which would paste the previously copied text (URL) from clipboard to the field and automatically press the "Leech" button.

If you want to save the message choose a section on the left side and press "Add message" button at the bottom.
If you don't have any sections then just enter the section's name at the top left and press "Add section" button.
For example I will be using this URL: http://www.rlslog.net/8-megaupload-megavideo-alternatives/
Enter the post URL in the "post URL" field which is above the message area.
On the left there is a "type" selection. You don't need to select anything. It's just to show the supported types. The type of the URL will be determined automatically.
On the right you can see a "Visit" button which will open the URL in the browser.
Just press the "Leech" button on the right and the message will be leeched.
There is also "Paste & Leech" button which would paste the previously copied text (URL) from clipboard to the field and automatically press the "Leech" button.
If you want to save the message choose a section on the left side and press "Add message" button at the bottom.
If you don't have any sections then just enter the section's name at the top left and press "Add section" button.
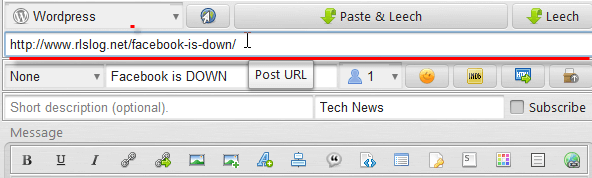
How to leech from IMDB
02.
You can find "Leech IMDB information" button above the message area:

When this button is pressed it will leech all imdb.com links from the message area and replace with IMDB Template which can be changed in the main settings. Default IMDB template looks like this:
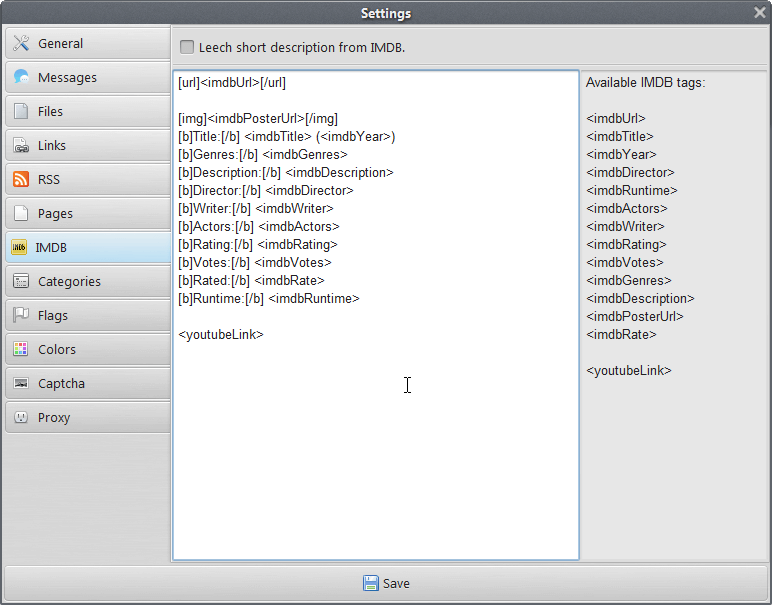
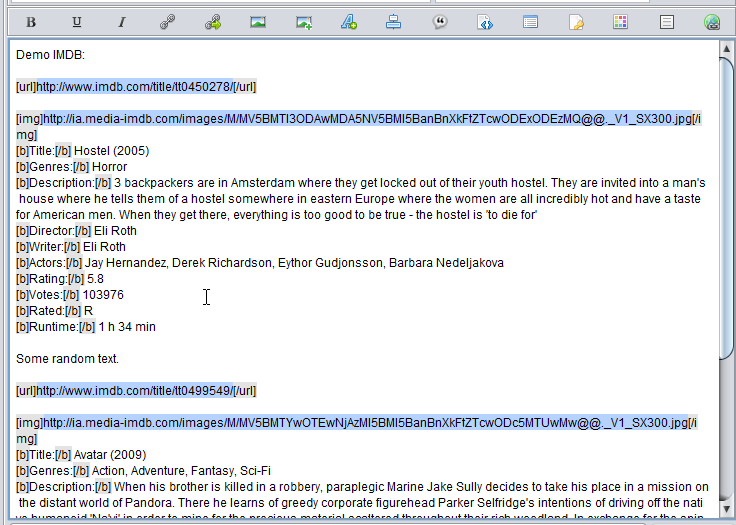
For example, your message contains couple of IMDB links like this:

After pressing the "Leech IMDB information" button the links will be replaced with the IMDB template and the message would look like this:
You can also leech from IMDB by title and year without having IMDB links in the message.
Message text must have special element <imdbInfo> where to insert leeched IMDB information. It can be inserted with replacements if needed.
The subject of message must start with title and follow with year (dots, underscores, braces doesn't matter).
When this button is pressed it will leech all imdb.com links from the message area and replace with IMDB Template which can be changed in the main settings. Default IMDB template looks like this:
For example, your message contains couple of IMDB links like this:
After pressing the "Leech IMDB information" button the links will be replaced with the IMDB template and the message would look like this:
You can also leech from IMDB by title and year without having IMDB links in the message.
Message text must have special element <imdbInfo> where to insert leeched IMDB information. It can be inserted with replacements if needed.
The subject of message must start with title and follow with year (dots, underscores, braces doesn't matter).
Cloudflare related issues and solutions
03.
Experiencing higher CPU load when trying to bypass Cloudflare?
Reduce (set lower) "Security processing threads" option in general settings. Recommended 1 or 2.
Reduce (set lower) "Security processing threads" option in general settings. Recommended 1 or 2.
4. General stuff
General settings
01.
You can find general settings in "Main settings" window -> "General" tab.

- Processes limit - the number of how many websites you can leech at the same time. You should keep in mind that after one website is leeched the process closes. If limit is reach the statuses are simply put in the queue.
- Timeout - seconds which indicates that website was unresponsive. Usually the default value of 6 works fine. If you have very slow internet and seeing a lot of "read timeout" errors you might try to increase the value of this setting.
Replacements
02.
Replacements are used to replace / remove some kind of wanted text from your message / subject when leeching is done.
Each website can have different replacements and they are applied to message / subject after leeching is done for specific host.
You can manage the replacements in "REPLACEMENTS" tab.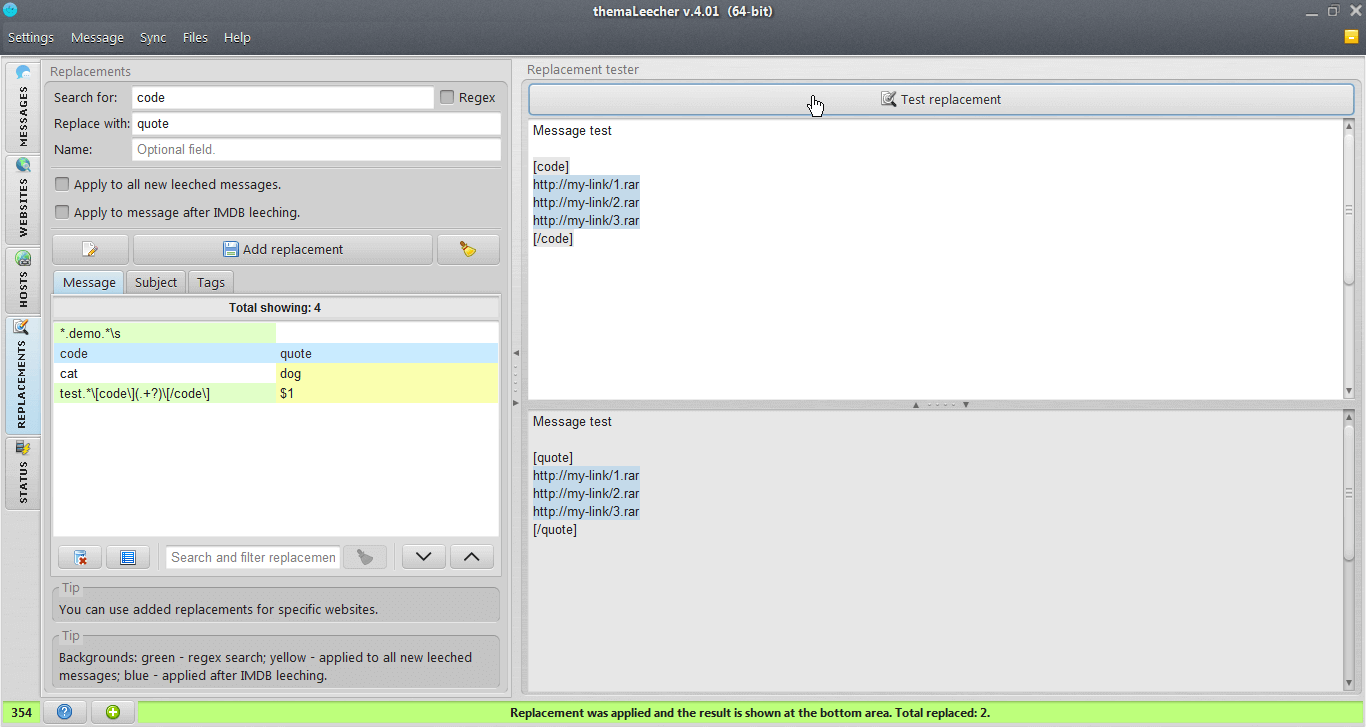
When adding replacement you can check "Apply to all leeched messages?" to aplly the replacement for all leeched messages.
If you don't want to apply it for all messages (all websites) just add replacement without enabling this option and you can assign added replacements to specific websites in "WEBSITES" -> "Replacements" tab.
The added replacements can also be applied to any message at any time in "MESSAGES" tab. There is a button above the message list:

You can use the replacements for few various reasons. Let's take a look at the basic examples.
You can also test the replacement.
Enter the "search for" and "replace with" (if needed enable the regex) -> enter some text in the top message area -> press the Test replacement" button.
The result message after the applied replacement will be shown at the bottom area.
Each website can have different replacements and they are applied to message / subject after leeching is done for specific host.
You can manage the replacements in "REPLACEMENTS" tab.
When adding replacement you can check "Apply to all leeched messages?" to aplly the replacement for all leeched messages.
If you don't want to apply it for all messages (all websites) just add replacement without enabling this option and you can assign added replacements to specific websites in "WEBSITES" -> "Replacements" tab.
The added replacements can also be applied to any message at any time in "MESSAGES" tab. There is a button above the message list:
You can use the replacements for few various reasons. Let's take a look at the basic examples.
- If you don't need [center] tag you can easily remove the [center] from the message.
-
You would only need to add these two replacements:
Search string: [center]
Replace with: (leave empty)
Search string: [/center]
Replace with: (leave empty) - Sometimes you need more advanced replacement. The regular expressions (regex) search is very handy in those situations. Regex is a very big topic and for more information and tutorials just search on Google.
- You can also use it to remove a line with some word.
Search string: .*cat.*(\n)
Replace with: $1
Mark the "regex search" checkbox.
This would remove all lines from the message which contain a word "cat". - To add something at the start of the subject (add in "Subject" replacements tab):
-
Search string: .+
Replace with: YourText $0
Mark the "regex search" checkbox.
This will add "YourText" at the start of the subject.
Don't use it for prefixes. themaPoster already have options for that. - You could remove the [url] tags like this [url=http://something.com]text[/url] with replacement:
-
Search string: (?i)\[url=(.+?)\](.+?)\[/url\]
Replace with: $1
Mark the "regex search" checkbox.
All the [url=http://something.com]text[/url], would be replaced to just "http://something.com". - See the help topic of the replacements in the forum for more useful examples.
Some links about regular expressions suggested by "Wurstmu":
- http://docs.oracle.com/javase/7/docs/api/java/util/regex/Pattern.html - general information.
- http://www.regular-expressions.info/ - very good source for all implementations of regular expressions. It also explains the basic concepts (greedyness, back references) well.
- http://www.regexr.com/ - good training environment with short reference; it tests in real time and is also a real time saver if you want to develop and test more complex expressions. User regex library available to get inspired.
- https://regex101.com/ - another real-time testing / training site for various regex flavours. It has also a short reference and a user expressions library..
- http://regexone.com/ - interactive online learning course for regex - very good for a first contact with the topic.
You can also test the replacement.
Enter the "search for" and "replace with" (if needed enable the regex) -> enter some text in the top message area -> press the Test replacement" button.
The result message after the applied replacement will be shown at the bottom area.
How to extract and replace links
03.
You can find the "Extract links" button above the messages list:

Also you can use shortcut ALT + E to quickly press the button.
After the pressing the button the links from the message area will be extracted.
You can set in "Main settings" -> "Message" to ignore images and/or IMDB links.
The extracted links window will look like this:

On left are extracted links grouped by the host.
On the right you can enter new links to replace with.
You can double click anywhere on the left links area and the links in that area will be copied to the clipboard.
You can load new links from .txt file if needed.
When you press the "Replace links" button the original links will be replaced with the new links.
They only be replaced if the right area is not empty and is filled with new links.
You can also enter letter "r" to quickly remove the links from the message.
You can add only needed hosts for extracting in "HOSTS" tab.
You can temporary enable or disable hosts when needed.
If no hosts for extracting is added then all hosts will be extracted.
Also you can use shortcut ALT + E to quickly press the button.
After the pressing the button the links from the message area will be extracted.
You can set in "Main settings" -> "Message" to ignore images and/or IMDB links.
The extracted links window will look like this:
On left are extracted links grouped by the host.
On the right you can enter new links to replace with.
You can double click anywhere on the left links area and the links in that area will be copied to the clipboard.
You can load new links from .txt file if needed.
When you press the "Replace links" button the original links will be replaced with the new links.
They only be replaced if the right area is not empty and is filled with new links.
You can also enter letter "r" to quickly remove the links from the message.
You can add only needed hosts for extracting in "HOSTS" tab.
You can temporary enable or disable hosts when needed.
If no hosts for extracting is added then all hosts will be extracted.
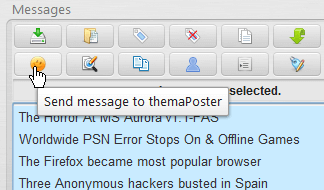
Send message to themaPoster fields
04.
You can find the "Send message to themaPoster" button above the message field:

Also you can use shortcut ALT + S to quickly press the button.
themaPoster must be running for this to work.
The subject, description ,tags, subscribe and message itself will be sent to the same fields in themaPoster.
The sent message from the list will be marked in orange color like this:
If you want you can remove the color (or change it to any custom color) by marking your message with color (see chapter 3.7).
Send messages to themaPoster for instant posting
05.
You can find the "Send messages to themaPoster" button above the message list:
Just select all wanted messages and press this button to send those messages for posting to themaPoster.
themaPoster must be running for this to work.
After you press the button you will be asked to choose an action "reply" (to topics) or "create" (new threads).
Then you will need to choose a group / section (synched from themaPoster) in which to post.
You can also change what to do when sending messages to themaPoster in "Main settings" window -> "Message" tab.
By default "Post messages immediately is enabled. You can change it to "Add messages to posts list" instead.
The sent message from the list will be marked in orange color like this:
If you want you can remove the color (or change it to any custom color) by marking your message with color (see chapter 4.7).
Load / save messages from / to .txt files
06.
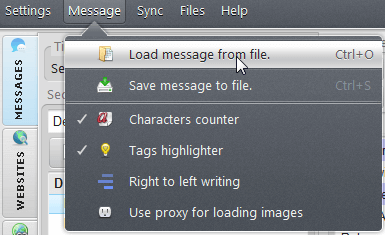
Loading messages from files
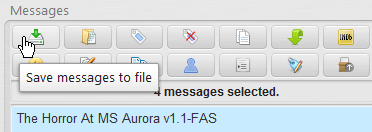
To load messages from .txt file just press "Load messages from file" button (it's near the "Save message to file" in above screenshot).
Then choose .txt files and finally choose a section where to save messages.
When loading messages from .txt you can use special elements (tags) in your .txt message.
| Element | Example | Description |
|---|---|---|
| <description> | <description>Your description here</description> | Provide the description. |
| <tags> | <tags>Tag1, Tag2, Tag3</tags> | Provide the tags. Usually comma separated. |
| <subscribe> | <subscribe>true</subscribe> | Subscribe to a post. For themaPoster. |
| <user> | <user>2</user> | Specify wanted user rank. Default rank is 1 which is usually fine if you don't have multiple users per forum. For themaPoster. |
| <cover> | <cover>Url</cover> | For themaPoster. Usually not needed, because option in themaPoster's "CONFIG" -> "General posting" -> "Grab first image as cover" is enabled by default and overall there are just few forums who use thread cover. |
| <subject> | <subject>Your subject</subject> | Specify subject if you don't want the program to grab it from file name. |
| <prefix> | <prefix>[MULTI]</prefix> | Specify prefix. Tag name is used inside. |
You can also load single message directly to the message area without saving to messages list from the "Message" menu:
There is an option to save message which is currently in the message area as well.
Saving messages to files
You can find save / load messages to / from .txt files buttons above the messages list:To save messages to .txt file just select all messages you want to save and press the "Save messages to file" button.
Then select a folder where to save .txt files.
When saving message to file the special elements by default are included in message text. They are supported in all thema programs (for example themaPoster) and are used to fill needed fields and completely removed from message text later.
You can disable them when saving to file in "Main settings" -> "Files", but that's not recommend.
Mark message with color
07.
You can find "Mark message with color" button above the messages list:


You can remove the color by selecting the messages and pressing the "Remove marked color" button which is near the "Mark with color" button.
You can add your own predefined colors with title in "Main settings" -> "Colors":
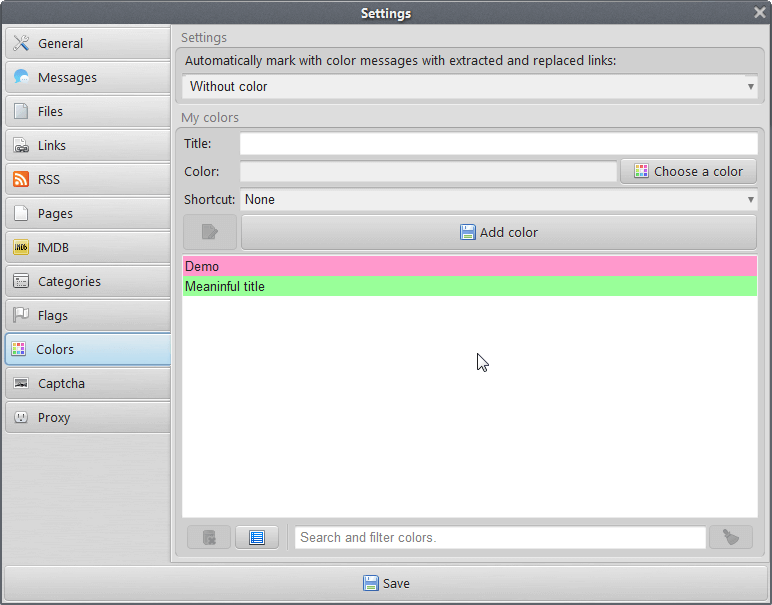
You can use your added when marking with color. They are in separate tab "My colors":
This makes possible to filter messages by color:

- First select the message(s) which you want to mark.
- Then press the "Mark with color" button.
- Choose the wanted color and press "OK" button
You can remove the color by selecting the messages and pressing the "Remove marked color" button which is near the "Mark with color" button.
You can add your own predefined colors with title in "Main settings" -> "Colors":
You can use your added when marking with color. They are in separate tab "My colors":
This makes possible to filter messages by color:
Change section for messages / pages / RSS feeds
08.
You can easily change section by pressing the "Change section" button which looks the same for messages, pages and RSS feeds:

Just select all messages / pages or RSS feeds which section you want to change and press the "Change section" button.
Then choose the new section.
Just select all messages / pages or RSS feeds which section you want to change and press the "Change section" button.
Then choose the new section.